Quick Start Guide
Welcome to your In2Cloud account!
This is a quick guide explaining how to setup a basic configuration. For more details see the complete documentation Business Telephony
1 . Use the credentials you have received by email. Do the password recovery process to generate new password and finalize login.

2. Your external telephone numbers are in the number manager

3. Create 1 user
To add a user:
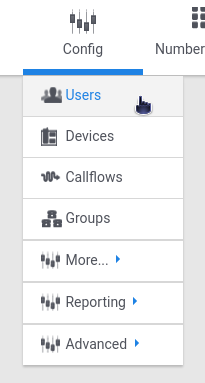
A) Navigate to the user management section of the Cloud IPBX.
B) Click the Add User button on the top left.

C) Fill out at least the basic fields for the username, first name, last name and email address of the user.
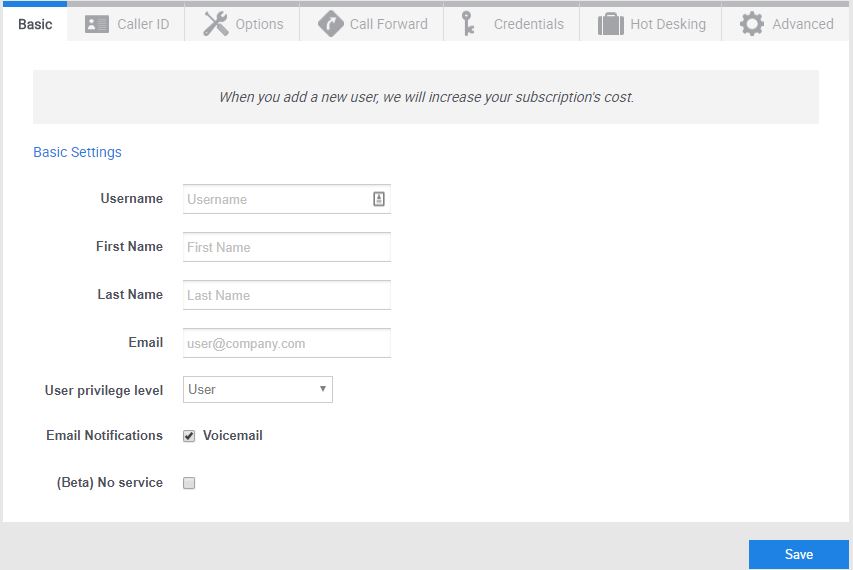
D) Click the save button.
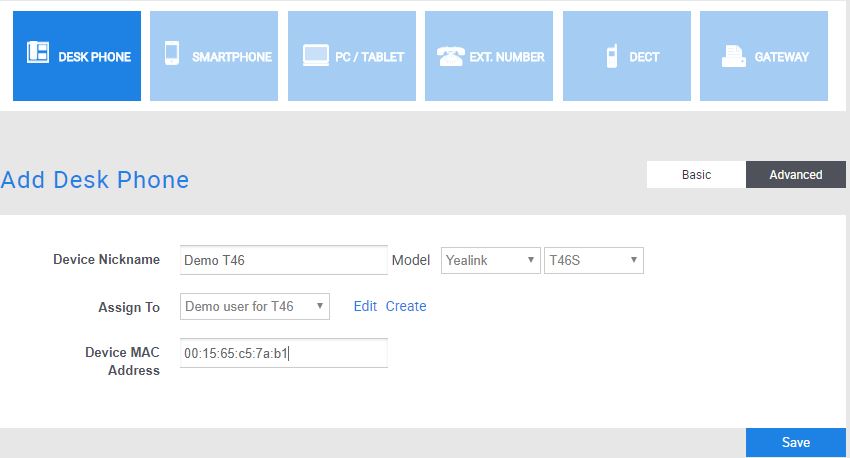
4. Create his/her devices
A) Navigate to the device management section of the Cloud IPBX.
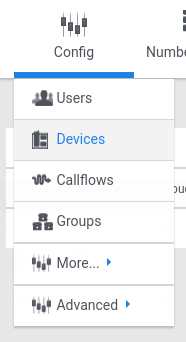
B) Click the Add User device on the top left.

C) Fill in the device nickname, the MAC address, select the type of device and assign it to the user.
D) If you want to use a softphone install Zoiper on your mobile and add a device of type smartphone, assign it to your user and finally scan the QR code with the application:

5. Outgoing calls
You are now ready to place outgoing calls from any of these devices
Make sure to set a Caller ID (this is the number that will be shown when you call somebody)
You can do this more generic for the whole account under “Config > Advanced > Account Details > Caller ID” or under the Caller ID tab of an user or a device
6. Setup incoming calls
In order to receive calls you must create a callflow. Callflows allow you to setup a serie of actions (ex: play a message, apply opening hours, ring a user). Navigate to the callflow.

A) click on Add Callflow

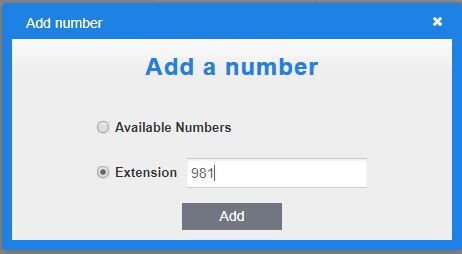
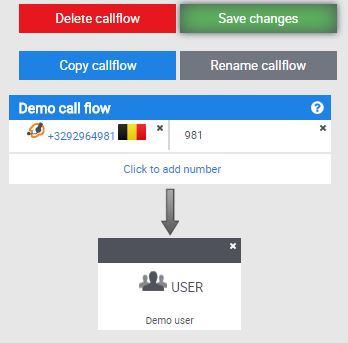
B) Let’s configure the incoming calls to your user. Click on Rename callflow and give your call flow a name. Afterwards, click in the area labeled “Click to add number”

C) In the pop-up, you can configure either an extension number or an external phone number that is on your account. For extension numbers you can make up any number of any length as long as it is not already in use.

D) Next, use the toolbox on the right hand side and drag the User icon on top of the phone number box you just configured

E) When you drop the User icon, a pop-up will appear asking which user you want to call. Select a user from the pop-up. You can also add a new user, and their associated devices, from the pop-up. Click OK when you’re done.

F) Your callflow will look like this when done :
Another example could be to setup a basic callflow for the main number of a company. In the example, the call goes to media, then a group of users and finaly, if nobody picks up in the group the call goes to the user “Demo user”.

6. List of the common available action boxes :
Device : Any device (hardware or software) that can connect to the IPBX.
User : A user is a person. We can assign him/her one or several devices, configure the voicemail to email, etc… Each user can access the user portal. If the callflow goes to the user and this user owns several devices then ALL those devices will ring simultaneously.
Group : It allows to group several users or devices together in order to make them ring simultaneously. Several ring strategies are available : all at the same time, in order or smart random.
Play Media : This action plays an audio file in a callflow. Example, if after 30 seconds nobody answers the phone, the caller could hear a message saying ‘sorry nobody is available to answer your call, please callback later’ without the possibility to leave a message.
Voicemail : The feature allows the caller to leave a vocal message. The voicemail can be sent by email or the user can listen to it via his phone.
Menu : Create a multiple choice menu allowing the caller to chose between several propositions. Example : For French dial 1, For Dutch dial 2, For English dial 3
Calendar : It allows you to configure opening hours and closing days for a phone number.
Conference : This feature allows to make a phone communication with several people together. The conference room can be reached from the outside or internally.